Analytics Blog

Implementing an Abandoned Cart Campaign Using Tealium AudienceStream & Responsys
Blast works with many leading organizations who use Tealium Tag Management (Tealium iQ). In this post, we’ll review an example of implementing Tealium’s sophisticated AudienceStream (AS) capabilities and its broad set of 3rd party connectors.
Specifically, how you could build an AudienceStream-centric abandoned cart strategy, connecting to the Responsys marketing system to send email campaigns to visitors who have met specific criteria.

Since this is a complex implementation, this tutorial has been cut down to focus on the not-so-obvious elements in making the systems work together, should you consider a similar implementation.
In this use-case scenario, the idea is to send a series of up to 3 email campaigns to a set of known customers who had previously added a product to their shopping cart, but did not complete the purchase transaction.
As always, the devil is in the details and other implementations will have constraints beyond those outlined here.
![]() Tip: When using AudienceStream you may have to construct elements in reverse order to what is shown here, building individual attributes and enrichments to the point where you are ready to define audiences.
Tip: When using AudienceStream you may have to construct elements in reverse order to what is shown here, building individual attributes and enrichments to the point where you are ready to define audiences.
AudienceStream: Configurations
Defining an Audience
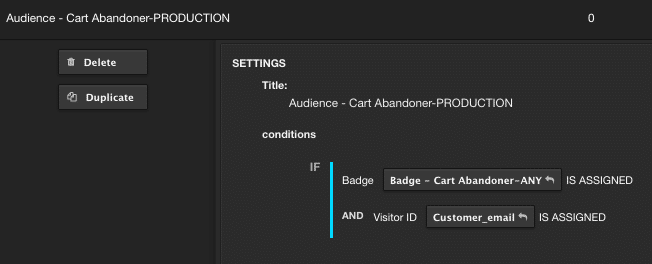
In AudienceStream, we are using a combination of a badge and an attribute to determine if the visitor qualified to be in the abandoned cart audience (i.e. customer segment).
![]() Tip: Since you have to build attributes, enrichment, rules, badges and audiences, using a naming convention helps you find previously created elements. As an example, start the element name like “Audience – xxx” or “Badge – xxx”.
Tip: Since you have to build attributes, enrichment, rules, badges and audiences, using a naming convention helps you find previously created elements. As an example, start the element name like “Audience – xxx” or “Badge – xxx”.
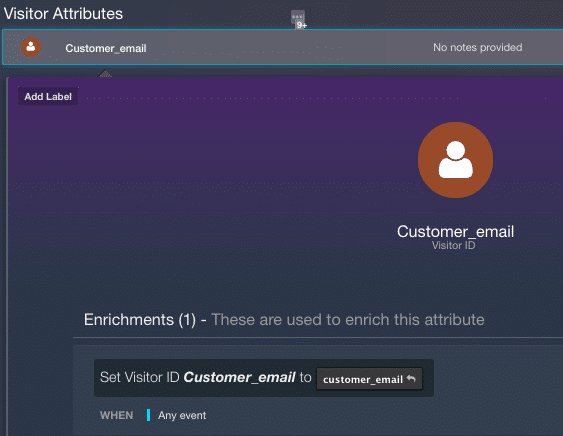
If we are planning to send an email to a customer, the visitor level attribute Customer_email has to exist (be assigned). The visitor’s email can be used to be configured using AudienceStream’s special data type called the Visitor_ID, which is used heavily inside the system to “stitch” visit sessions together and recognize an individual visitor — and to make sure Tealium iQ communicates this ID to AudienceStream.

The badge concept within Tealium AudienceStream is pretty handy. Essentially, badges are assigned or removed based on criteria you define then can be used as an audience definition. In our case, we will create a cart abandoner segment by assigning a badge to any visit where the following criteria is met:
- The boolean attribute Add to Cart occurred this visit = TRUE
- The boolean attribute Purchase Complete = FALSE
- The boolean attribute Removed from Cart this visit = FALSE
* This criteria may not be needed in your implementation if you have an effective way to know if specific cart items were remaining in a cart. For this tutorial, we use a rather primitive rule to define the case where the visitor’s intent was unclear.
![]()
We are also adding a simple badge removal enrichment — which may not be intuitive at first— but this enrichment intentionally removes a visitor from an audience. For example, upon returning to the site following the first reminder email generated from a campaign, a subsequent visit will then remove the visitor from the abandoned cart campaign. This is important, as you may have a series of delayed actions with cool down periods queued up, and the strategy here is to purposefully interrupt that flow.
![]()
Defining Actions
Any visitor decisioning system is only as good as the actions it can take.
For AudienceStream, the set of connectors to 3rd party systems is extensive, which will come in handy for our next step. The following step to implement our abandoned cart strategy involves sending emails. So, this section covers how to configure AudienceStream and the Responsys email system to work together.
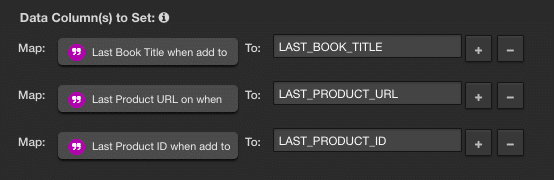
There might be 101 different ways to build an email campaign using Responsys on its own. We’re going to use AudienceStream to take advantage of some unique visit attributes grabbed during the customer visit, and use these to personalize the emails. When a visitor adds something to their cart, we want Tealium iQ to set the following data layer attributes in order for them to be available to AudienceStream:
- The name of the product
- The ID of the product
- The URL of the product details
This will give us sufficient detail to use the name of the product the visitor considered purchasing, and build a link back to the product details page within the body of any campaign creative.
![]() Tip: For testing AudienceStream, use connectors to the Slack instant messaging system to notify you when test visitors reach various audiences.
Tip: For testing AudienceStream, use connectors to the Slack instant messaging system to notify you when test visitors reach various audiences.
Integrating Tealium AudienceStream With Responsys
Responsys Connector
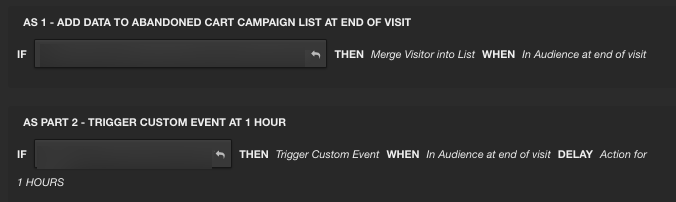
To properly send an email using Responsys, you need to configure it as a 2 step process within AudienceStream.
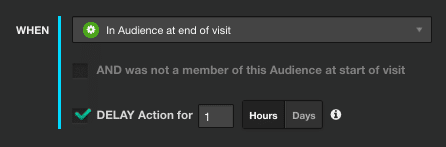
- Merge a visitor into a Responsys list when that visitor is in the audience at the end of a visit.
- Trigger a Responsys Custom Event which sets the program in motion. Use a 1 hour cool down to trigger the initial email.
Responsys will need a few minutes to process the merge of the customer data and an immediate triggering of an email event will result in no email being sent.
Responsys Configurations
Create a New List, Email Campaign Body, and Program
After logging into to your Responsys system, create a folder to hold all of your AudienceStream-specific files. The folder name will be used when we complete the AudienceStream configurations.
Next, create an empty email list schema with a standard set of fields, plus the custom fields you will bring over from AudienceStream. You probably already have a default email campaign template, and if so, note or add the additional fields that will come in from the Tealium connector.

Add a Custom Event Definition
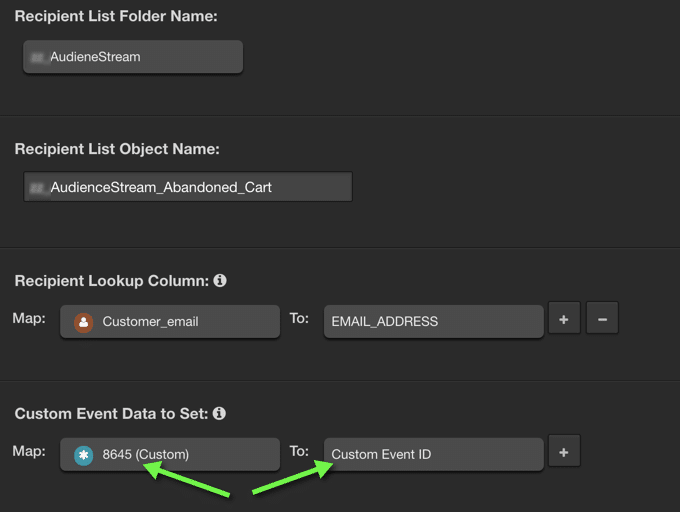
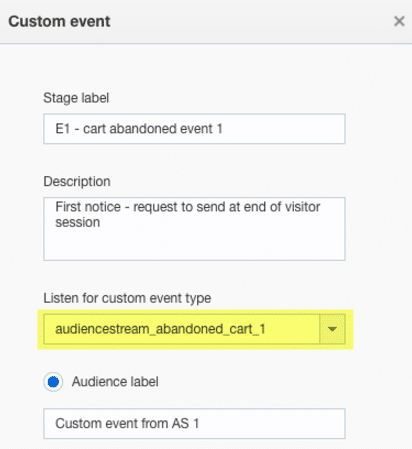
In the Responsys Account menu options under Global Settings, you will see there is a menu item to define custom event types. Creating these is a simple but important step. These IDs are the values needed within the AudienceStream connector to Responsys that indicates which email should be sent.
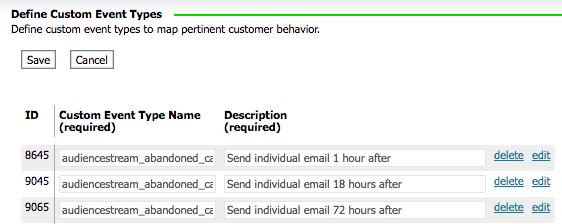
You use these both in AudienceStream’s Responsys connector and in the Responsys Program Designer.
The program configurations in the Responsys Program Designer can be kept very simple, containing a custom event trigger, an email campaign, and end. For our basic tutorial we built one for each of the 3 intended email creatives.
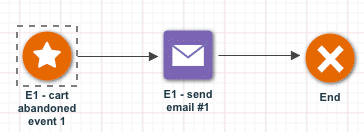
When you configure the custom event (the star icon) by double-clicking, you can link this trigger to the Customer Event Type Name from above.
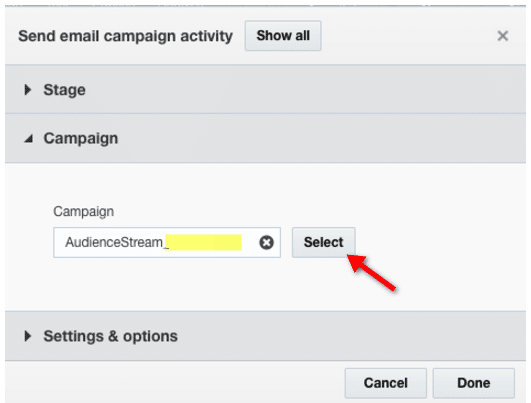
Create Your Campaign Email Creative
Almost to the home stretch. Within the Program Designer, each node for an Email Campaign will need to be configured as well. Double click the node and select the campaign you’ve created.
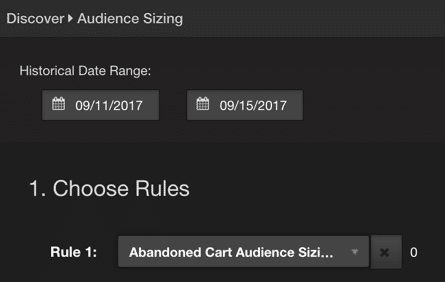
![]() Tip: Using the Audience Sizing tool we were able to estimate how many candidate visitors would qualify for the campaign in a given week.
Tip: Using the Audience Sizing tool we were able to estimate how many candidate visitors would qualify for the campaign in a given week.
Flow Testing and Final Launch
As a final step to this abandoned cart email notification campaign project, you should consider a series of use-case tests to make sure the 3 emails being sent have the appropriate cool down periods, and that any creative matches the timing of the message being sent. It is also important to test the normal interruption of the AudienceStream strategy by testing a visitor returning to the site.
By using the AudienceStream Trace feature, you can observe the visitor’s audience definition revert from the abandoned cart audience.
Final Considerations
This strategy is well known: Reach out to customers to persuade them to return to their cart and complete a purchase. In implementing an all AudienceStream controlled strategy there are many details that need to be ironed out that are beyond the scope of this simplified example.
Since this type of project requires the sending of email campaigns, you will need to be sure someone from the creative team is brought on board at the project onset. If you need to capture additional data layer elements you will need Tealium iQ resources and ensure data in the data layer is timely. We recommend you set realistic key performance indicators up front based on the desired number of emails being sent to customers, click through rate, and purchase completion rate.
Only with a set of clearly defined KPIs will you be able to determine if your campaign has succeeded.
Lastly, as you’ve learned in this blog post, Tealium AudienceStream can be a rather complicated setup. If you don’t have the expertise in-house, we are available to support all types of Tealium iQ and AudienceStream implementations.
Request a Tealium AudienceStream consultant contact you to discuss your needs.


If you have questions or you’re ready to discuss how Blast can help you EVOLVE your organization, talk to an Analytics Consultant today.
Call 1 (888) 252-7866 or contact us below.